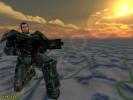
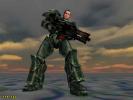
TUTORIALS - ModelCal3D
Abstract
 This tutorial explains how to load and animate a Cal3D model in a basic environment. The tutorials about MD3 and MD2 models are referenced when possible.
Index
- Comments to the ModelCal3D source
- Preparing Cal3D models for loading
1. Comments to the ModelCal3D source
Before reading this tutorial, it's necessary to follow carefully the tutorial about MD3 models because some parts regarding the set up of the basic environment are very similar. Only the differences about the model management are treated here.
This document refers to the ModelCal3D.lua sources included in the file DemoPack0-lua-0.8.0.zip available for download at the Downloads page. It's recommended to keep a paper copy of the source at hand for easy reference. It's better also to keep open the HTML manual with the list of APOCALYX API to understand the use of some function calls.
It's time to read the source and comment it. Skipped lines are marked with --[cut]--.
----Cal3D Model
----Questions? Contact: Leonardo Boselli <boselli@uno.it>

----INITIALIZATION----
function init()
--[cut]--
--[[
As usual the engine needs 4 functions to render the scene. In the initialization we cut the already explained code for the camera, skybox, sun, terrain and help lines, but consider an element of the environment not analyzed before: The cloud layer.
]]--
  ----CLOUDLAYER----
  local cloudsImage = zip:getImage("cloudlayer2.jpg")
  local alphaImage = zip:getImage("cloudlayer2.png")
  cloudsImage:addAlpha(alphaImage)
  local cloudsTexture = Texture(cloudsImage,1)
  cloudsImage:delete()
  alphaImage:delete()
  local material = Material()
  material:setEmissive(1,1,1)
  material:setEnlighted(false)
  material:setDiffuseTexture(cloudsTexture)
  local cloudLayer = CloudLayer(material,2000,100,6)
  cloudLayer:setSpeed(10,10)
  cloudLayer:setColor(0.8,0.6,0.3)
  setCloudLayer(cloudLayer)
--[cut]--
--[[
A cloud layer is a simple plane, apparently infinite, placed at a certain height, over which is applied a transparent texture with cloud patterns. The cloud layer can move in a given direction and even be animated.
The lines listed above perform the following actions:
- First of all, the texture is created. The texture is built from two images, a color one and an alpha layer for the transparency.
- Then the texture becomes the diffuse texture of a material. This material is not enlighted: This means that light sources does not affect its appearance.
- Finally the material is passed to the constructor of the cloud layer. The cloud layer of the demo has a side of 2000 meters length, the height is 100 meters and the texture is tiled 6 times.
- At the end, after giving a reddish color with setColor() (this call affects the emissive component of the material), the cloud layer is added to the world with a call to setCloudLayer(). More layers may be superimposed with a call to addCloudLayer().
Now let's consider the main character of this tutorial: The Cal3D model.
]]--
  ----MODELS----
  animation = 0
  model = zip:getAdvancedModel("paladin.cfg")
  model:pitch(-3.1415/2);
  model:rotStanding(3.1415);
  model:scale(1/40.0);
  model:setScaled()
  model:setCulled(false)
  model:setMaxRadius(2)
  model:move(0,0,0)
  model:disableSprings()
  addObject(model)
--[cut]--
end
--[[
The lines above are very similar to those of the MD2 or MD3 models, but there are some differences.
- The model is loaded with getAdvancedModel(), not getModel() or getBasicModel(). That function is devoted to Cal3D models.
- Again some rotation are needed to place the model in its right orientation. The different convention of the axis strikes again.
- Even this time the model needs a scaling factor, but now the coordinates of the vertices are not trasformed (at least in the current version of APOCALYX) so we must specify that a rescaling of the normals is needed too with a call to setScaled(). This step is not necessary for MD2 or MD3 models. In addition the maxRadius property must be explicitly set because it is not automatically computed yet.
- Another difference is the call to move(). This time the origin of the model is placed between its feet, so no translation is necessary (the call move(0,0,0) may be removed since a model is placed there by default).
- Two final notes: setCulled() specifies that both front and back faces of triangles must be rendered (a particularity of the model of the demo) and disableSprings() requests that the inner physics engine of the Cal3D models must be disabled (quite annoying for this particular model the bad behavior of its cloths).
- As usual, the model is finally added to the world with addObject().
]]--
----LOOP----
function update()
--[cut]--
end

----FINALIZATION----
function final()
--[cut]--
end
--[[
As already happened in the MD2 models tutorial, no interesting stuff is found in update() and final().
Let's consider finally the simple lines that control the choice of the current animation.
]]--
----KEYBOARD----
function keyDown(key)
--[cut]--
  if key >= string.byte("0") and key <= string.byte("9") then
    local anim = key-string.byte("0")
    if anim < model:getAnimationsCount() then
      model:clearCycle(animation)
      model:blendCycle(anim)
      animation = anim
    end
  end
--[cut]--
end
As you can see, every time a key between "0" and "9" (a number key) is pressed a new animation is performed. If the key does not correspond to an existing animation, it is ignored. Then the old animation is cleared with clearCycle() and the new one is applied with blendCycle().
The control of Cal3D models may be more sophisticated. Animation can be cleared with a delay factor while another animation fades in, thus transitions between animation are very smooth. In addition more animation can be blended togheter during the same action. These advanced features are not shown here, but they are controlled by additional parameters of clearCycle() and blendCycle() that specify the weight of a given animation and the delay to reach its maximum weight. This topics will be covered in another tutorial.
I hope that these few descriptions are enough clear to understand the basic interface to Cal3D models. Feel free to ask more if you need further explanations.
2. Preparing Cal3D models for loading
This section explains how to package Cal3D models for loading in APOCALYX. Cal3D is the format of the Character Animation Library, an open source project by Bruno Heidelberger. APOCALYX includes one of the latest versions of the Cal3D - Character Animation Library.
 As usual, to introduce the argument, let's make some step backward. After downloading and unzipping the file DemoPack0-lua-0.8.0.zip, you get several files amound which:
- ModelCal3D.lua, the code of this demo, a text file the contents of which were explained in the previous section.
- DemoPack0.dat, that includes the resources (images, models etc.) needed by the demos, a ZIP file renamed.
If you open DemoPack0.dat with an unzip utility, you'll find a lot of files in it. The Cal3D model needs a lot of them:
- paladin.cfg, that contains the information needed to reconstruct the whole model;
- paladin.csf, the skeleton of the model;
- several paladin_*.caf, the animation data of the different actions (walk, run etc.);
- several paladin_*.cmf, the data of the meshes;
- several paladin_*.crf, the data of the materials;
- several paladin_*.jpg, the images of the textures.
The Cal3D library can use a binary format (like the one of the files listed above) or a readable XML format. APOCALYX does not support the second type when the files are zipped in a package, so be careful to verify the format of the files when you zip them toghether.
 The most important file, from the programmer point of view, is the paladin.cfg. It is not automatically generated by modelling applications and must follow this format:
# model: paladin
skeleton=paladin.csf
animation=paladin_walk.caf
animation=paladin_idle.caf
# some lines skipped
mesh=paladin_body.cmf
mesh=paladin_cape.cmf
# some lines skipped
material=paladin_cape.crf
material=paladin_head.crf
# some lines skipped
The tags skeleton, animation, mesh and material specify the name of the file that the engine must look for when loading the model. Lines beginning with "#" are comments and ignored. Apart cfg, No other files (csf, caf, cmf, crf) need to be modified before packaging, if they are already in binary format.
The procedure is not so difficult, but feel free to ask more if anything is obscure yet.


